Bài 1: Triển khai class Circle theo diagram

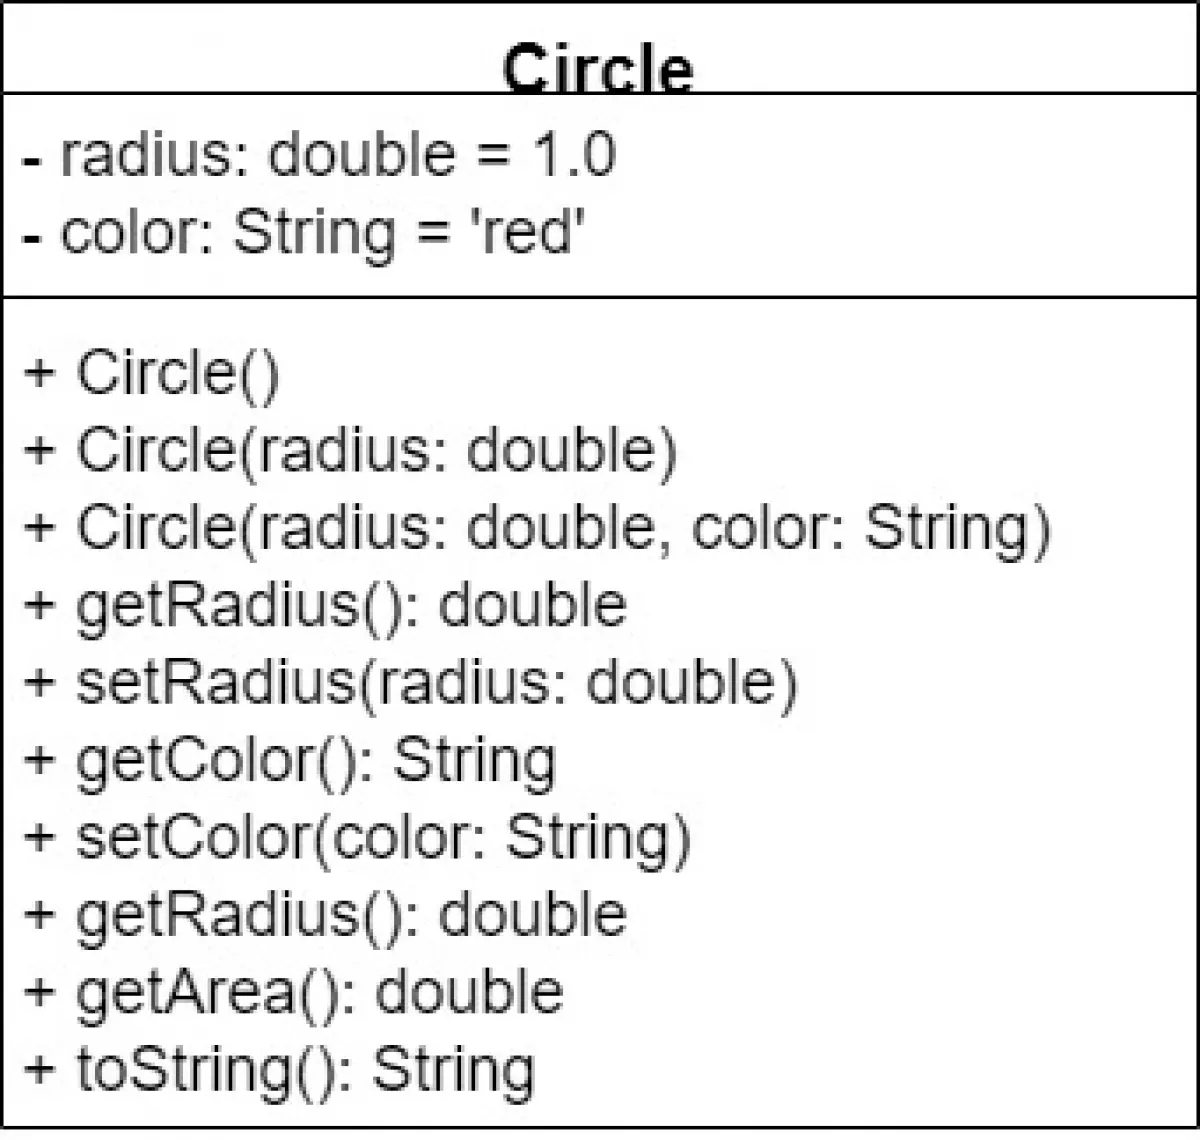
Cho class Circle được thiết kế theo, có chứa:
- Hai biến private (-): radius có kiểu dữ liệu là double, và color là String. Hai thuộc tính có có giá trị mặc định khi khởi tạo là radius = 1.0 và color = red.
- Ba constructor trong đó có 1 constructor mặc định sẽ khởi tạo giá trị mặc định cho radius và red là 1.0 và red. Các constructor Circle(radius: double) sẽ khởi tạo giá trị cho radius và color là red. Circle(radius: double, color: String) sẽ khởi tạo giá trị cho cả radius và color.
- getRadius() và setRadius(radius: double) là 2 hàm lấy và gán giá trị mới cho radius.
- getColor và setColor(color: String) là 2 hàm gán và lấy giá trị mới cho color.
- getArea(): dùng để tính diện tích hình tròn.
- toString(): Trả về thông tin của radius và color ra màn hình console.
package com.company; public class Circle { private double radius; private String color; public Circle() { this.radius = 1.0; this.color = "red"; } public Circle(double radius) { this.radius = radius; this.color = "red"; } public Circle(double radius, String color) { this.radius = radius; this.color = color; } public double getRadius() { return radius; } public void setRadius(double radius) { this.radius = radius; } public String getColor() { return color; } public void setColor(String color) { this.color = color; } public double getArea() { return this.radius * this.radius * Math.PI; } public String toString() { return "Radius: " + this.radius + " - Color: " + this.color; } }package com.company; public class Main { public static void main(String[] args) { // Test default constructor Circle circle1 = new Circle(); display(circle1); // Test constructor has 1 parameter radius Circle circle2 = new Circle(2.0); display(circle2); // Test constructor has 2 parameter radius, color Circle circle3 = new Circle(2.0, "blue"); display(circle3); // Test getter setter Circle circle4 = new Circle(); circle4.setColor("Green"); circle4.setRadius(3.0); display(circle4); } public static void display(Circle circle) { System.out.println(circle.toString()); System.out.println("Area: " + circle.getArea()); System.out.println(); } }Output:
Radius: 1.0 - Color: red Area: 3.141592653589793 Radius: 2.0 - Color: red Area: 12.566370614359172 Radius: 2.0 - Color: blue Area: 12.566370614359172 Radius: 3.0 - Color: Green Area: 28.274333882308138Bài 2: Triển khai class Rectangle theo diagram

Thiết kế class Rectangle theo sơ đồ trên gồm:
- Constructor mặc định và constructor có 2 tham số length, width để gán giá trị cho 2 thuộc tính tương ứng của Rectangle.
- setLength(length: int): gán giá trị cho thuộc tính length của class.
- getLength(): Trả về giá trị length của class.
- setWidth(width: int): gán giá trị cho thuộc tính width của class.
- getWidth(): Trả về giá trị width của class.
- getArea(): Tính diện tích của Rectangle
- toString(): Trả về chuỗi thông tin cần thiết của Rectangle như length, width.
Gợi ý: area = length * width
public class Rectangle { private int length; private int width; public Rectangle(int length, int width) { this.length = length; this.width = width; } public void setLength(int length) { this.length = length; } public int getLength() { return length; } public void setWidth(int width) { this.width = width; } public int getWidth() { return width; } public int getArea() { return length * width; } public String toString() { return "Length: " + length + " - Width: " + width; } } public class Main { public static void main(String[] args) { Rectangle rectangle = new Rectangle(10, 5); System.out.println(rectangle.toString()); System.out.println("Area: " + rectangle.getArea()); } }Output:
Length: 10 - Width: 5 Area: 50Bài 3: Triển khai class Employee theo diagram

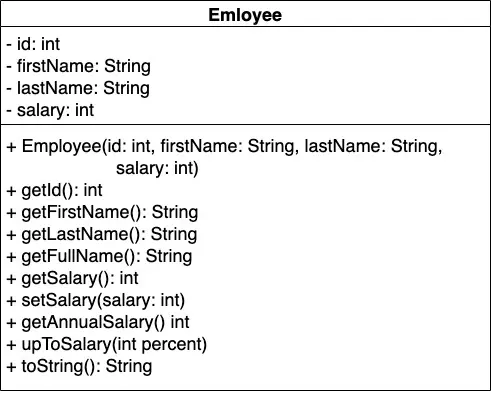
getFullName(): FulllName = lastName + firstName
getAnnualSalary() tính tổng lương nhận hằng năm => salary * 12
upToSalary(): Tính tiền lương sau khi tăng lên percent(%). Ví dụ percent = 10% => output = salary + (salary * precent) / 100
public class Employee { private String firstName; private String lastName; private int salary; public Employee(String firstName, String lastName, int salary) { this.firstName = firstName; this.lastName = lastName; this.salary = salary; } public String getFullName() { return lastName + " " + firstName; } public int getAnnualSalary() { return salary * 12; } public void upToSalary(int percent) { salary += (salary * percent) / 100; } } public class Main { public static void main(String[] args) { Employee employee = new Employee("John", "Doe", 5000); System.out.println("Full Name: " + employee.getFullName()); System.out.println("Annual Salary: " + employee.getAnnualSalary()); employee.upToSalary(10); System.out.println("Salary after increase: " + employee.getAnnualSalary()); } }Output:
Full Name: Doe John Annual Salary: 60000 Salary after increase: 66000Bài 4: Triển khai class Account theo diagram

Mô tả: class Account có 3 biến private: id, name, balance.
Một hàm khởi tạo Account 3 thuộc tính id, name, balance.
credit(amount: int): Nạp tiền vào tài khoản, tài khoản sẽ được cộng lên một khoản amount. Kiểm tra tham số đầu vào phải là số dương.
debit(amount: int): Thanh toán tiền, tài khoản sẽ được trừ một số lượng tiền amount. Nếu số tiền thanh toán lớn hơn số tiền trong tài khoản thì thông báo thanh toán không thành công.
tranferTo(account: Account), chuyển tiền từ tài khoản này cho tài khoản khác. Ví dụ Account A có balance = 50, B có balance = 10. A.transferTo(B, 10). A (balance = 40), B (balance = 20). Chú ý kiểm tra nếu chuyển số tiền nhiều hơn tài khoản hiện có thông báo lỗi chuyển tiền không thành công.
public class Account { private int id; private String name; private int balance; public Account(int id, String name, int balance) { this.id = id; this.name = name; this.balance = balance; } public int getId() { return id; } public String getName() { return name; } public int getBalance() { return balance; } public void credit(int amount) { if (amount > 0) { balance += amount; } } public void debit(int amount) { if (amount > balance) { System.out.println("Payment unsuccessful"); } else { balance -= amount; } } public void transferTo(Account account, int amount) { if (amount > balance) { System.out.println("Transfer unsuccessful"); } else { balance -= amount; account.credit(amount); } } } public class Main { public static void main(String[] args) { Account a = new Account(1, "A", 50); Account b = new Account(2, "B", 10); System.out.println("Balance A: " + a.getBalance()); System.out.println("Balance B: " + b.getBalance()); a.credit(30); System.out.println("Balance A: " + a.getBalance()); System.out.println("Balance B: " + b.getBalance()); a.debit(20); System.out.println("Balance A: " + a.getBalance()); System.out.println("Balance B: " + b.getBalance()); a.debit(1000); System.out.println("Balance A: " + a.getBalance()); System.out.println("Balance B: " + b.getBalance()); a.transferTo(b, 10); System.out.println("Balance A: " + a.getBalance()); System.out.println("Balance B: " + b.getBalance()); } }Output:
Balance A: 50 Balance B: 10 Balance A: 80 Balance B: 10 Balance A: 60 Balance B: 10 Payment unsuccessful Balance A: 60 Balance B: 10 Balance A: 50 Balance B: 20Bài 5: Triển khai class Date theo diagram

Ở bài này, chúng ta chưa cần đến việc kiểm tra ngày tháng năm hợp lệ hay không.
isLeapYear(): Kiểm tra năm nhuận, năm nhuận là năm chia hết cho 400 hoặc chia hết cho 4 nhưng không chia hết cho 100.
Nếu các bạn muốn kiểm tra ngày tháng năm hợp lệ thì gợi ý:
- Month: có giá trị từ 1 - 12
- Các tháng 1, 3, 5, 7, 8, 10, 12 thì số ngày tối đa là 31 ngày
- Tháng 2: nếu là năm nhuận thì số ngày tối đa là 29, còn lại là 28
- Các tháng còn lại tối đa là 30 ngày.
public class Date { private int day; private int month; private int year; public Date(int day, int month, int year) { this.day = day; this.month = month; this.year = year; } public int getDay() { return day; } public void setDay(int day) { this.day = day; } public int getMonth() { return month; } public void setMonth(int month) { this.month = month; } public int getYear() { return year; } public void setYear(int year) { this.year = year; } public String toString() { return "Date{" + "day=" + day + ", month=" + month + ", year=" + year + '}'; } public boolean isLeapYear() { if (this.year % 400 == 0) return true; if (this.year % 4 == 0 && this.year % 100 != 0) return true; return false; } } public class Main { public static void main(String[] args) { Date date = new Date(12, 3, 2016); System.out.println(date.toString()); System.out.println(date.isLeapYear()); } }Output:
Date{day=12, month=3, year=2016} true


