Trong phần trước của hướng dẫn, chúng ta đã làm quen với một số kỹ thuật lập trình game 2D Android như sử dụng SurfaceView, vẽ trên Canvas, di chuyển nhân vật và tương tác với cử chỉ người chơi. Trong phần này, chúng ta sẽ tiếp tục khám phá các kỹ thuật lập trình game khác để tạo ra một trò chơi hoàn chỉnh.
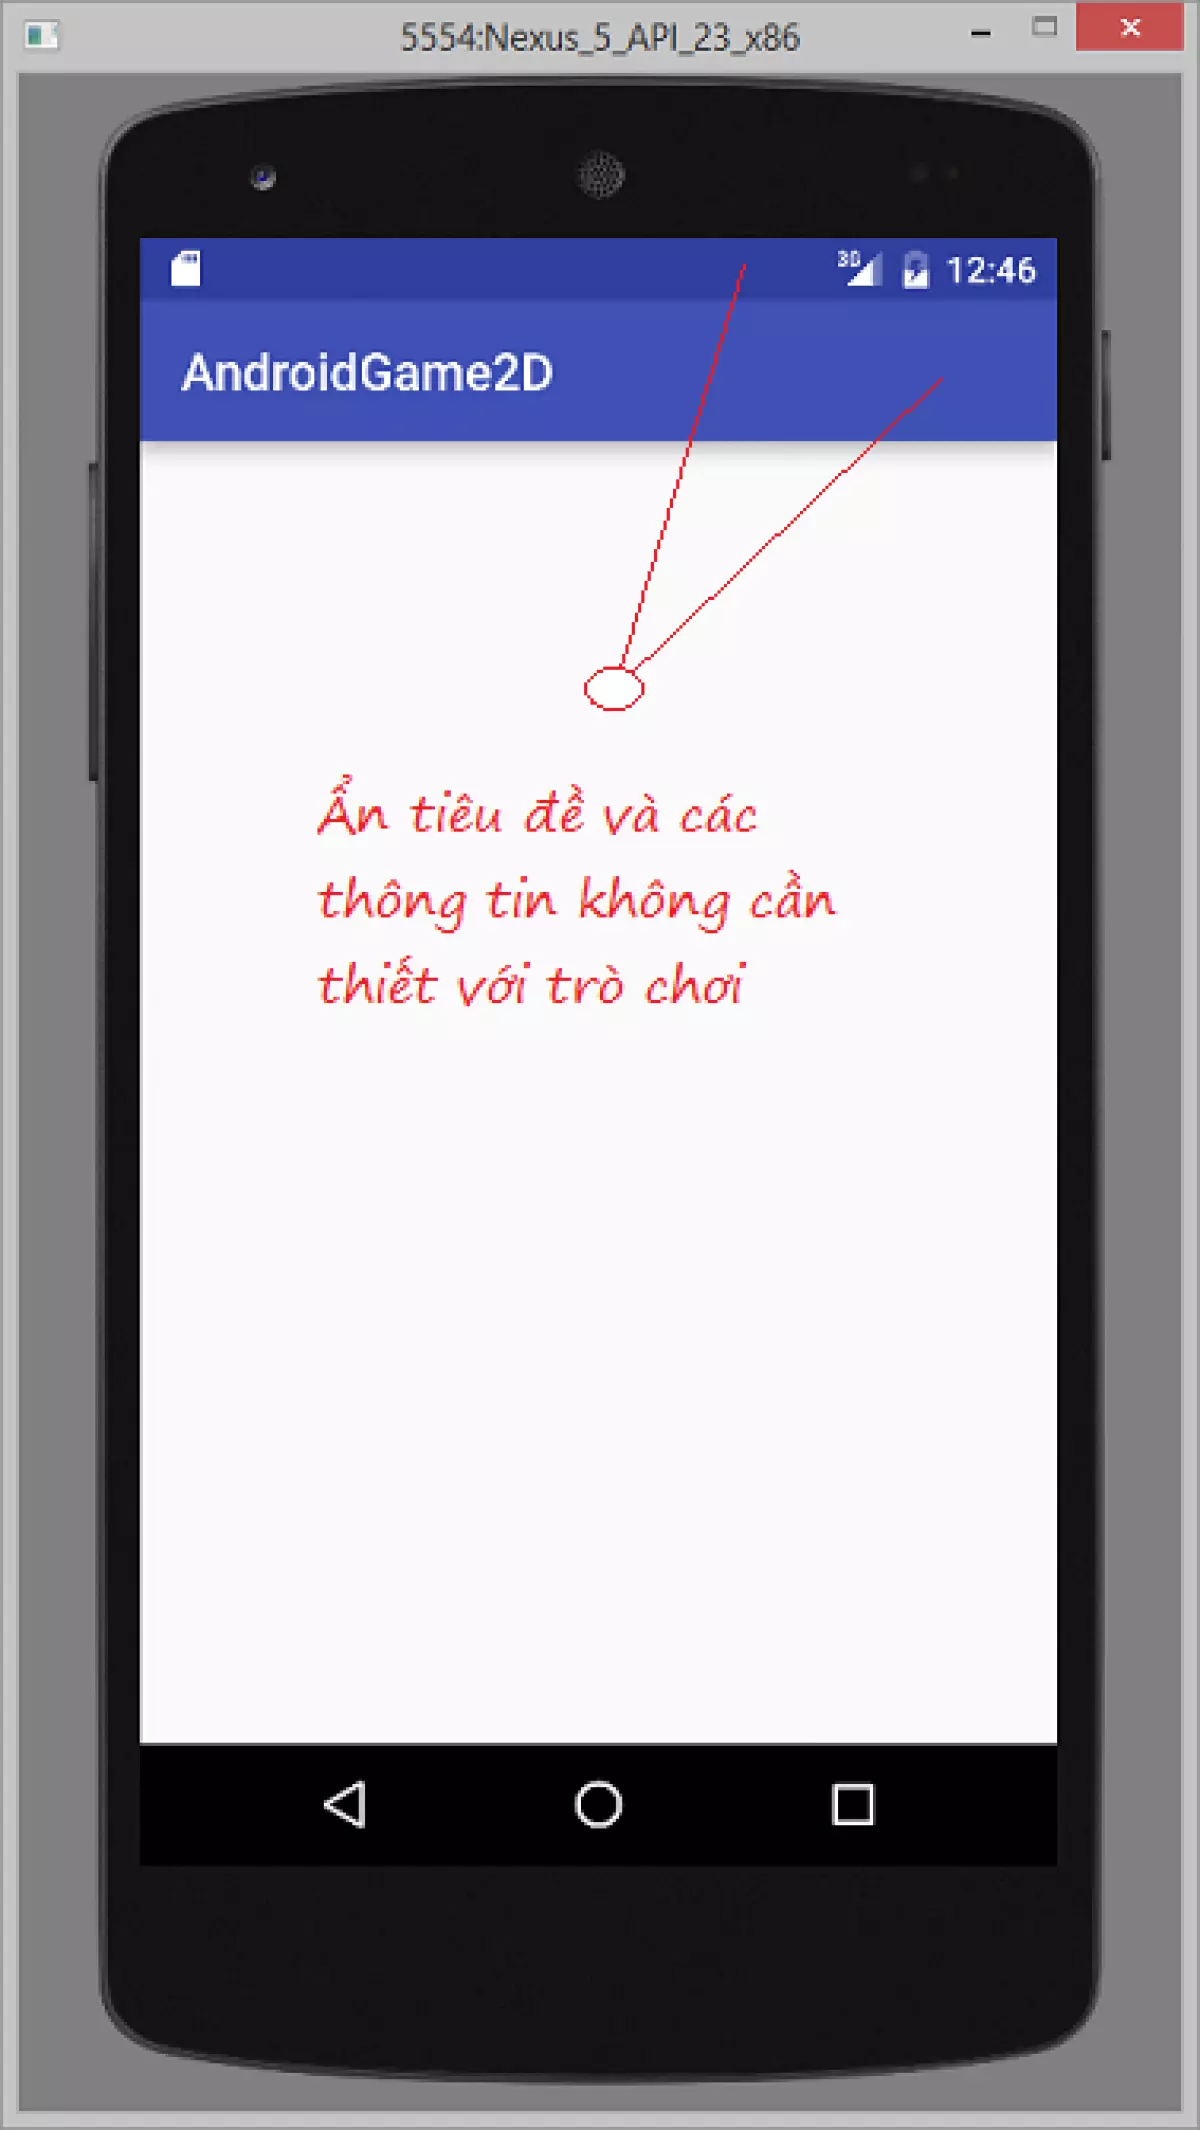
Sét đặt chế độ fullscreen
Để tạo một trò chơi thú vị, trước tiên bạn cần thiết lập chế độ fullscreen (Toàn màn hình). Điều này đảm bảo rằng trò chơi của bạn sẽ được hiển thị một cách triệt để trên màn hình điện thoại. Bạn có thể sét đặt chế độ fullscreen trong class MainActivity bằng cách extends từ class Activity.
public class MainActivity extends Activity {
    @Override
    protected void onCreate(Bundle savedInstanceState) {
        super.onCreate(savedInstanceState);
        // Set fullscreen
        this.getWindow().setFlags(WindowManager.LayoutParams.FLAG_FULLSCREEN, WindowManager.LayoutParams.FLAG_FULLSCREEN);
        // Set No Title
        this.requestWindowFeature(Window.FEATURE_NO_TITLE);
    }
}
Với đoạn mã trên, trò chơi của bạn sẽ được hiển thị ở chế độ fullscreen trên thiết bị di động.
Hiển thị nhân vật trên trò chơi
Tiếp theo, bạn cần viết mã để hiển thị nhân vật trò chơi trên màn hình và di chuyển nó từ trái qua phải theo một vận tốc nhất định.
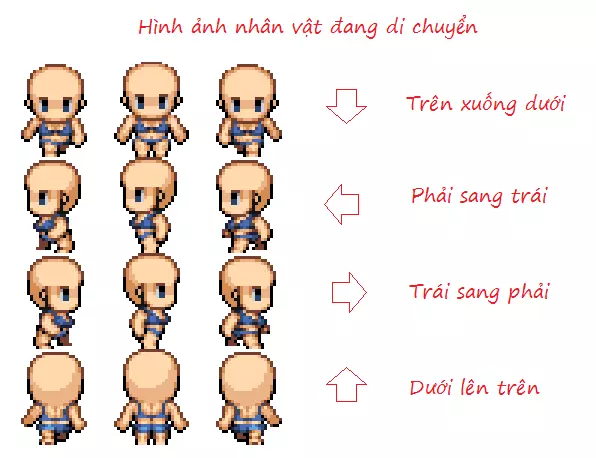
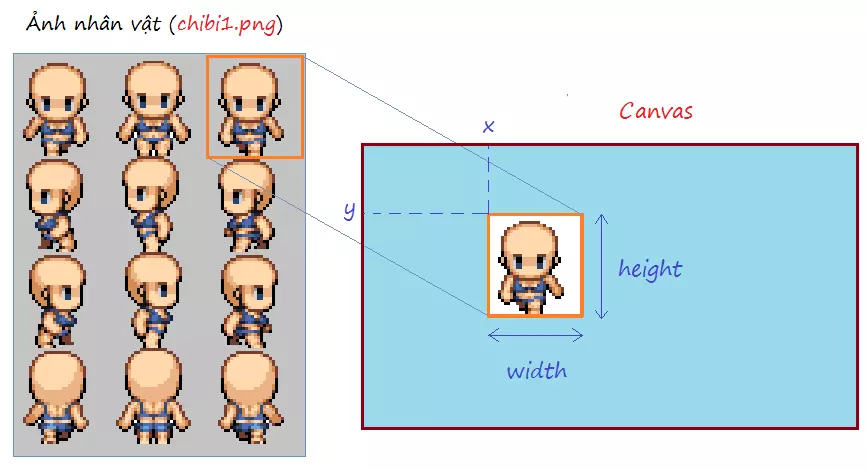
Trong trò chơi, mỗi nhân vật chỉ có một file ảnh, nhưng file ảnh được chia ra thành nhiều vùng mô tả các hành động khác nhau của nhân vật. Bằng cách sử dụng mã, bạn có thể vẽ một vùng ảnh lên đối tượng Canvas của trò chơi tại tọa độ x, y. Sử dụng vòng lặp for để liên tục vẽ lại trên Canvas, bạn có thể tạo ra sự chuyển động của nhân vật.
Trong quá trình lập trình trò chơi, hãy lưu ý hướng di chuyển của nhân vật và vận tốc của nó.
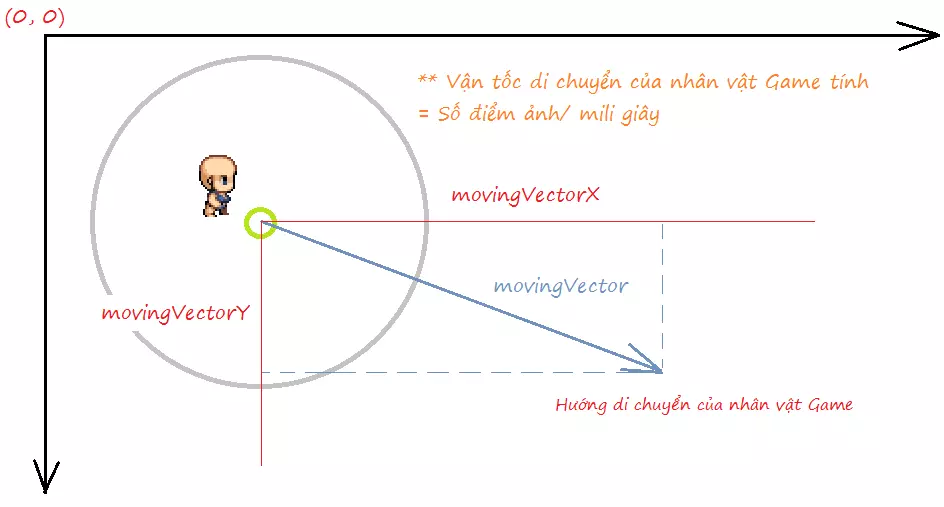
Để tạo một nhân vật trong trò chơi, bạn cần tạo một lớp GameObject mà các đối tượng của trò chơi sẽ mở rộng từ đó.
public abstract class GameObject {
    protected Bitmap image;
    protected final int rowCount;
    protected final int colCount;
    protected final int WIDTH;
    protected final int HEIGHT;
    protected final int width;
    protected final int height;
    protected int x;
    protected int y;

    public GameObject(Bitmap image, int rowCount, int colCount, int x, int y) {
        this.image = image;
        this.rowCount= rowCount;
        this.colCount= colCount;
        this.x= x;
        this.y= y;
        this.WIDTH = image.getWidth();
        this.HEIGHT = image.getHeight();
        this.width = this.WIDTH/ colCount;
        this.height= this.HEIGHT/ rowCount;
    }

    protected Bitmap createSubImageAt(int row, int col) {
        // createBitmap(bitmap, x, y, width, height).
        Bitmap subImage = Bitmap.createBitmap(image, col* width, row* height ,width,height);
        return subImage;
    }

    public int getX() {
        return this.x;
    }

    public int getY() {
        return this.y;
    }

    public int getHeight() {
        return height;
    }

    public int getWidth() {
        return width;
    }
}
Lớp GameObject chứa các thuộc tính và phương thức chung cho tất cả các đối tượng trong trò chơi.

Sau đó, bạn cần tạo một lớp ChibiCharacter để mô phỏng một nhân vật trong trò chơi.
public class ChibiCharacter extends GameObject {
    private static final int ROW_TOP_TO_BOTTOM = 0;
    private static final int ROW_RIGHT_TO_LEFT = 1;
    private static final int ROW_LEFT_TO_RIGHT = 2;
    private static final int ROW_BOTTOM_TO_TOP = 3;

    // vị trí hàng ảnh đang được sử dụng.
    private int rowUsing = ROW_LEFT_TO_RIGHT;
    private int colUsing;

    private Bitmap[] leftToRights;
    private Bitmap[] rightToLefts;
    private Bitmap[] topToBottoms;
    private Bitmap[] bottomToTops;

    // Vận tốc của nhân vật (pixel/millisecond)
    public static final float VELOCITY = 0.1f;
    private int movingVectorX = 10;
    private int movingVectorY = 5;
    private long lastDrawNanoTime =-1;

    private GameSurface gameSurface;

    public ChibiCharacter(GameSurface gameSurface, Bitmap image, int x, int y) {
        super(image, 4, 3, x, y);
        this.gameSurface= gameSurface;

        this.topToBottoms = new Bitmap[colCount]; // 3
        this.rightToLefts = new Bitmap[colCount]; // 3
        this.leftToRights = new Bitmap[colCount]; // 3
        this.bottomToTops = new Bitmap[colCount]; // 3

        for(int col = 0; col< this.colCount; col++ ) {
            this.topToBottoms[col] = this.createSubImageAt(ROW_TOP_TO_BOTTOM, col);
            this.rightToLefts[col] = this.createSubImageAt(ROW_RIGHT_TO_LEFT, col);
            this.leftToRights[col] = this.createSubImageAt(ROW_LEFT_TO_RIGHT, col);
            this.bottomToTops[col] = this.createSubImageAt(ROW_BOTTOM_TO_TOP, col);
        }
    }

    public Bitmap[] getMoveBitmaps() {
        switch (rowUsing) {
            case ROW_BOTTOM_TO_TOP:
                return this.bottomToTops;
            case ROW_LEFT_TO_RIGHT:
                return this.leftToRights;
            case ROW_RIGHT_TO_LEFT:
                return this.rightToLefts;
            case ROW_TOP_TO_BOTTOM:
                return this.topToBottoms;
            default:
                return null;
        }
    }

    public Bitmap getCurrentMoveBitmap() {
        Bitmap[] bitmaps = this.getMoveBitmaps();
        return bitmaps[this.colUsing];
    }

    public void update() {
        this.colUsing++;

        if(colUsing >= this.colCount) {
            this.colUsing =0;
        }

        long now = System.nanoTime();

        if(lastDrawNanoTime==-1) {
            lastDrawNanoTime= now;
        }

        int deltaTime = (int) ((now - lastDrawNanoTime)/ 1000000 );

        float distance = VELOCITY * deltaTime;

        double movingVectorLength = Math.sqrt(movingVectorX* movingVectorX + movingVectorY*movingVectorY);

        this.x = x + (int)(distance* movingVectorX / movingVectorLength);
        this.y = y + (int)(distance* movingVectorY / movingVectorLength);

        if(this.x < 0 ) {
            this.x = 0;
            this.movingVectorX = - this.movingVectorX;
        } else if(this.x > this.gameSurface.getWidth() -width) {
            this.x= this.gameSurface.getWidth()-width;
            this.movingVectorX = - this.movingVectorX;
        }

        if(this.y < 0 ) {
            this.y = 0;
            this.movingVectorY = - this.movingVectorY;
        } else if(this.y > this.gameSurface.getHeight()- height) {
            this.y= this.gameSurface.getHeight()- height;
            this.movingVectorY = - this.movingVectorY ;
        }

        if( movingVectorX > 0 ) {
            if(movingVectorY > 0 && Math.abs(movingVectorX) < Math.abs(movingVectorY)) {
                this.rowUsing = ROW_TOP_TO_BOTTOM;
            }else if(movingVectorY < 0 && Math.abs(movingVectorX) < Math.abs(movingVectorY)) {
                this.rowUsing = ROW_BOTTOM_TO_TOP;
            }else {
                this.rowUsing = ROW_LEFT_TO_RIGHT;
            }
        } else {
            if(movingVectorY > 0 && Math.abs(movingVectorX) < Math.abs(movingVectorY)) {
                this.rowUsing = ROW_TOP_TO_BOTTOM;
            }else if(movingVectorY < 0 && Math.abs(movingVectorX) < Math.abs(movingVectorY)) {
                this.rowUsing = ROW_BOTTOM_TO_TOP;
            }else {
                this.rowUsing = ROW_RIGHT_TO_LEFT;
            }
        }

        this.lastDrawNanoTime= System.nanoTime();
    }

    public void draw(Canvas canvas) {
        Bitmap bitmap = this.getCurrentMoveBitmap();
        canvas.drawBitmap(bitmap,x, y, null);
    }

    public void setMovingVector(int movingVectorX, int movingVectorY) {
        this.movingVectorX= movingVectorX;
        this.movingVectorY = movingVectorY;
    }
}
Lớp ChibiCharacter chứa các hình ảnh và phương thức để di chuyển nhân vật trong trò chơi.

Cuối cùng, bạn cần tạo một lớp GameSurface để mô phỏng toàn bộ bề mặt của trò chơi. Lớp này mở rộng từ SurfaceView và chứa một đối tượng Canvas, các đối tượng trong trò chơi sẽ được vẽ lên Canvas.
public class GameSurface extends SurfaceView implements SurfaceHolder.Callback {
    private GameThread gameThread;
    private ChibiCharacter chibi1;

    public GameSurface(Context context) {
        super(context);
        // Cho phép Game Surface xử lý các sự kiện
        this.setFocusable(true);
        // Thiết lập callback
        this.getHolder().addCallback(this);
    }

    public void update() {
        this.chibi1.update();
    }

    @Override
    public void draw(Canvas canvas) {
        super.draw(canvas);
        this.chibi1.draw(canvas);
    }

    // Phương thức của SurfaceHolder.Callback
    @Override
    public void surfaceCreated(SurfaceHolder holder) {
        Bitmap chibiBitmap1 = BitmapFactory.decodeResource(this.getResources(),R.drawable.chibi1);
        this.chibi1 = new ChibiCharacter(this,chibiBitmap1,100,50);
        this.gameThread = new GameThread(this,holder);
        this.gameThread.setRunning(true);
        this.gameThread.start();
    }

    // Phương thức của SurfaceHolder.Callback
    @Override
    public void surfaceChanged(SurfaceHolder holder, int format, int width, int height) {
    }

    // Phương thức của SurfaceHolder.Callback
    @Override
    public void surfaceDestroyed(SurfaceHolder holder) {
        boolean retry= true;
        while(retry) {
            try {
                this.gameThread.setRunning(false);
                this.gameThread.join();
            }catch(InterruptedException e) {
                e.printStackTrace();
            }
            retry= true;
        }
    }
}
Lớp GameSurface chứa các phương thức để vẽ và cập nhật trò chơi.
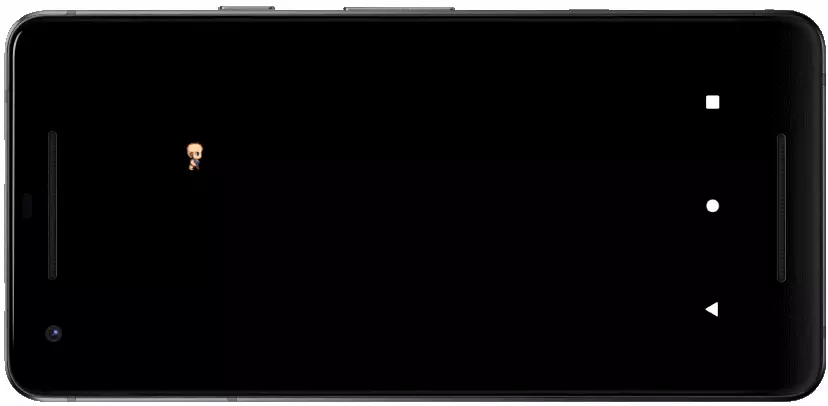
Cuối cùng, trong lớp MainActivity, hãy thay đổi phương thức onCreate để hiển thị trò chơi trên GameSurface.
public class MainActivity extends Activity {
    @Override
    protected void onCreate(Bundle savedInstanceState) {
        super.onCreate(savedInstanceState);
        // Set fullscreen
        this.getWindow().setFlags(WindowManager.LayoutParams.FLAG_FULLSCREEN, WindowManager.LayoutParams.FLAG_FULLSCREEN);
        // Set No Title
        this.requestWindowFeature(Window.FEATURE_NO_TITLE);
        this.setContentView(new GameSurface(this));
    }
}
Sau khi thực hiện các bước trên, bạn đã hoàn thành phần thứ hai của hướng dẫn lập trình game Android đơn giản sử dụng Android Studio. Bạn đã học cách sét đặt chế độ fullscreen cho trò chơi và hiển thị nhân vật trên màn hình.
Tiếp tục bước tiến học tập với phần tiếp theo của hướng dẫn để tạo ra một trò chơi hoàn chỉnh.


